Showing posts with label vegetarian. Show all posts

Thursday, July 25, 2013

Zucchini Flower Frittata

The zucchini are flowering again and I have a bounty of flowers and baby zucchini in my garden.  I plant the zucchini primarily for their flowers and any zucchini that manage to grow are an added bonus.  So Sunday morning, with a houseful of guests, zucchini became the star ingredient for brunch.  

Zucchini Flower Frittata
8 fresh eggs from the market
4 or 5 zucchini flowers
2 or 3 baby zucchini, less than 2"long
1 small onion, about 2 tablespoons when chopped
a handful of fresh herbs from the garden
1/4 cup of freshly coarsely grated Parmesan cheese
1/4 cup of vegetable oil
1/4 cup of olive oil

Serves 4 to 6 

Break eggs into a large bowl and whisk eggs until smooth.  Wash flowers, making sure that no bugs are hiding inside the flowers, and dry.  Remove pestle from the inside of male flowers.  Cut baby zucchini in half length wise.  Finely chop onion.  Clean herbs and coarsely chop.  Dip the flowers in the egg mixture, then dredge in flour.  

Heat oil in heavy cast iron pan, until very hot, but not smoking. Fry dredged zucchini flowers, until golden, on all sides.  Remove flowers and rest on paper towels to remove excess oil.  Turn down heat on stove, remove most of oil from bottom of pan, and saute onions until soft, and baby zucchini until until golden.  Mix half of herbs into remaining whisked eggs.  Turn oven broiler on. 

Spread onion and zucchini mixture evenly over bottom of pan.  Add eggs, arrange zucchini flowers in eggs, and sprinkle the remaining herbs on top.  Cook over medium heat until eggs are firm around edges.  Sprinkle Parmesan cheese on top and put on middle rack of oven to cook top half of eggs.  Watch eggs, and when the  eggs puff up they are done.  Do not over cook.  Remove from oven and serve either hot or at room temperature. 


Thursday, July 11, 2013

Orange Humus


Orange Humus
I first started making this recipe back in the early eighties. I had recently graduated from university, and was asked by a vegetarian friend to bring humus to her party.  I didn't  know what humus was at the time and of course this was long before the internet.  I had three cook books at the time, Better Homes and Gardens Cook Book which my grandmother gave me when I was eight, The Joy of Cooking which I bought in university and The Enchanted Broccoli Forest which I bought to so that I could feed my vegetarian friends.  Better Homes and Gardens didn't have a recipe, The Joy of Cooking required me to buy 3 ingredients, chick peas, tahini ( I didn't know what tahini was either) and black olives, and the Enchanted Broccoli Forest didn't require the black olives.  Being on a tight budget, the Broccoli Forest recipe was the one I opted for.  It was a huge success and I continue to make orange humus to this day.  My version of the recipe has evolved since then, and continues to be a crowd favorite.  It is incredibly easy to make and is always better if made the night before.

1 540 ml (19 oz) can of chick peas
1/2 teaspoon of cumin
1/2 teaspoon of ground coriander
1 teaspoon of dry ginger
1/2 teaspoon of dry mustard
1/2 teaspoon of turmeric
1/2 teaspoon of smoked hot paprika
1/2 cup of concentrated frozen orange juice
1/4 cup of tahini
1/4 cup of olive oil
1 teaspoon of salt
2 tablespoons of cider vinegar
3 garlic cloves
2 tablespoons of chopped of onion

Put all of the ingredients into a food processor and blend until almost smooth.  Adjust the consistency as required by adding more of the concentrated orange juice if required.  If I have a fresh orange I will grate some of the orange peel into the mixture.  Place in a container, seal and store in the refrigerator. 

Thursday, March 7, 2013

Vegetarian Chilli


Vegetarian Chili
When my daughter decided to become a vegetarian in grade school, I was motivated to ensure she was eating a balanced diet, however, I was not as thrilled about the idea of eating food that tasted overly righteous.  I had visions of the sixties and seventies and all those vegetarian restaurants that served brown mush. Equally as unappetizing was the idea of tofu disguised as fake meat.

Chilli had been a family staple, and substituting chunks of portabello mushrooms for the meat provided some depth and and texture while not straying too far from our family fav, even if it was dangerously close to a brown mush dish.

If I am organized, the night before, I soak the beans in water with an onion, some thyme and a bay leaf on low in the slow cooker.  Alternately,  I use canned beans in the chili the day of.

When cooked in a slow cooker, the flavours tend to be more complex, because they have the time to meld together.  This recipe also works well on the stove top, in heavy pot and of course, tastes better the next day.

Serves 6 with left overs
  • 1 cup of dried black beans, or 1 14 oz can
  • 1 cup of dried kidney beans, or 1 14 oz can
  • 1 cup of well washed quinoa
  • 1/4 cup of olive oil
  • 3 large onions, peeled and coarsely chopped
  • 2 large portobello mushrooms, cut into 1" squares
  • 1 zucchini, cut into 1/4" slices
  • 1 red pepper, cut into 1" squares
  • 5 cloves of garlic, diced
  • 1 28 oz  can of whole tomatoes
  • 1 small can of tomato paste
  • 1 -2 tablespoons of chilli powder depending on the amount of heat you are comfortable with
  • 1/2 dried chili, seeds removed to lessen the heat,
  • 1/2 teaspoon Spanish piquant paprika,
  • 11/2 teaspoons cumin
  • 1/2 teaspoon of turmeric
  • 1 branch of fresh thyme, or about 1/2 teaspoon of dried
  • 1/2 cup of red wine,
  • 2 tablespoons of coco powder
  • 2 tablespoons of balsamic vinegar
  • 1 teaspoons of pepper corns
  • 2 bay leaves
  • smokey salt, salish
  • fresh cilantro
In a heavy pan, I prefer cat iron, sauté onions in some of the olive oil, add garlic soften. Place in large cast iron pot or slow cooker. Next sauté the mushrooms, and red pepper, add more olive oil if necessary in the frying pan, add zucchini last and soften.  Add chillies, paprika, cumin and turmeric.  Cook for about a minute.  Transfer to the pot.  Add the remainder of the ingredients except the cilantro. If using a slow cooker, turn to low and leave for 6 hours on low, or high for 4 hours.    On the stove top let simmer for at least an hour.  The longer the better.  Taste and add finishing salt if required.   

Serve with fresh cilantro.  My daughter does not eat dairy, however, I will add a dollop of yogurt, or sour cream on top of mine.   

Saturday, December 29, 2012

Claire's Risotto with Wild Mushrooms, Sun Dried Tomatoes and Rocket

Claire loves risotto and excels at making it as well, so when her friends came for dinner before going out for a night on the town, she made a fabulous pot of things we had picked up at markets on our holidays.  There were dried wild mushrooms and sun dried tomatoes from the Flower Market in Nice, a bottle of Terret-Chardoney we had purchased at our favourite wine store in Nice, and Parmesan Reggiano from our day trip to Italy.  On the way home from the Tate Modern, we made a small detour and picked up the rest of the ingredients including some rocket from Bourogh Market.


Claire's Risotto with Wild Mushrooms, Sun Dried Tomatoes and Rocket


  • 2 tablespoons of olive oil
  • 1 shallot
  • 500 grams of arborio rice
  • 2 cups of white wine
  • 3 cups of chicken broth
  • 1 cup of dried wild mushrooms
  • 1/2 cup of semi-sun dried tomatoes coarsely cut
  • rocket (arugula)
  • 1 1/2 cups of grated Parmesan Reggiano
  • 2 tablespoons of butter
  • salt and pepper
Soak dried mushrooms in 2 cups of hot water for an hour.  Coarsely dice shallot.  In a large heavy sauce pan, put 2 tablespoons of olive oil, and heat on stove top,  add shallots and cook until translucent.  Add rice and stir, cooking until the rice has a translucent shell.  Over medium heat, add half of the wine and stir until the the wine is absorbed.  Add the remainder of the wine and stir again until absorbed.  Drain liquid from mushrooms, strain and set aside.  Add mushroom broth to rice mixture and stir until absorbed. Add chicken broth 1/2 cup at time stirring until absorbed and repeating until the rice is cooked el denté.  Stir in mushrooms, tomatoes and cheese.  Add rocket and stir again.  Taste, adjust salt and pepper.  Add a chunk of butter, stir and serve.

Sunday, December 9, 2012

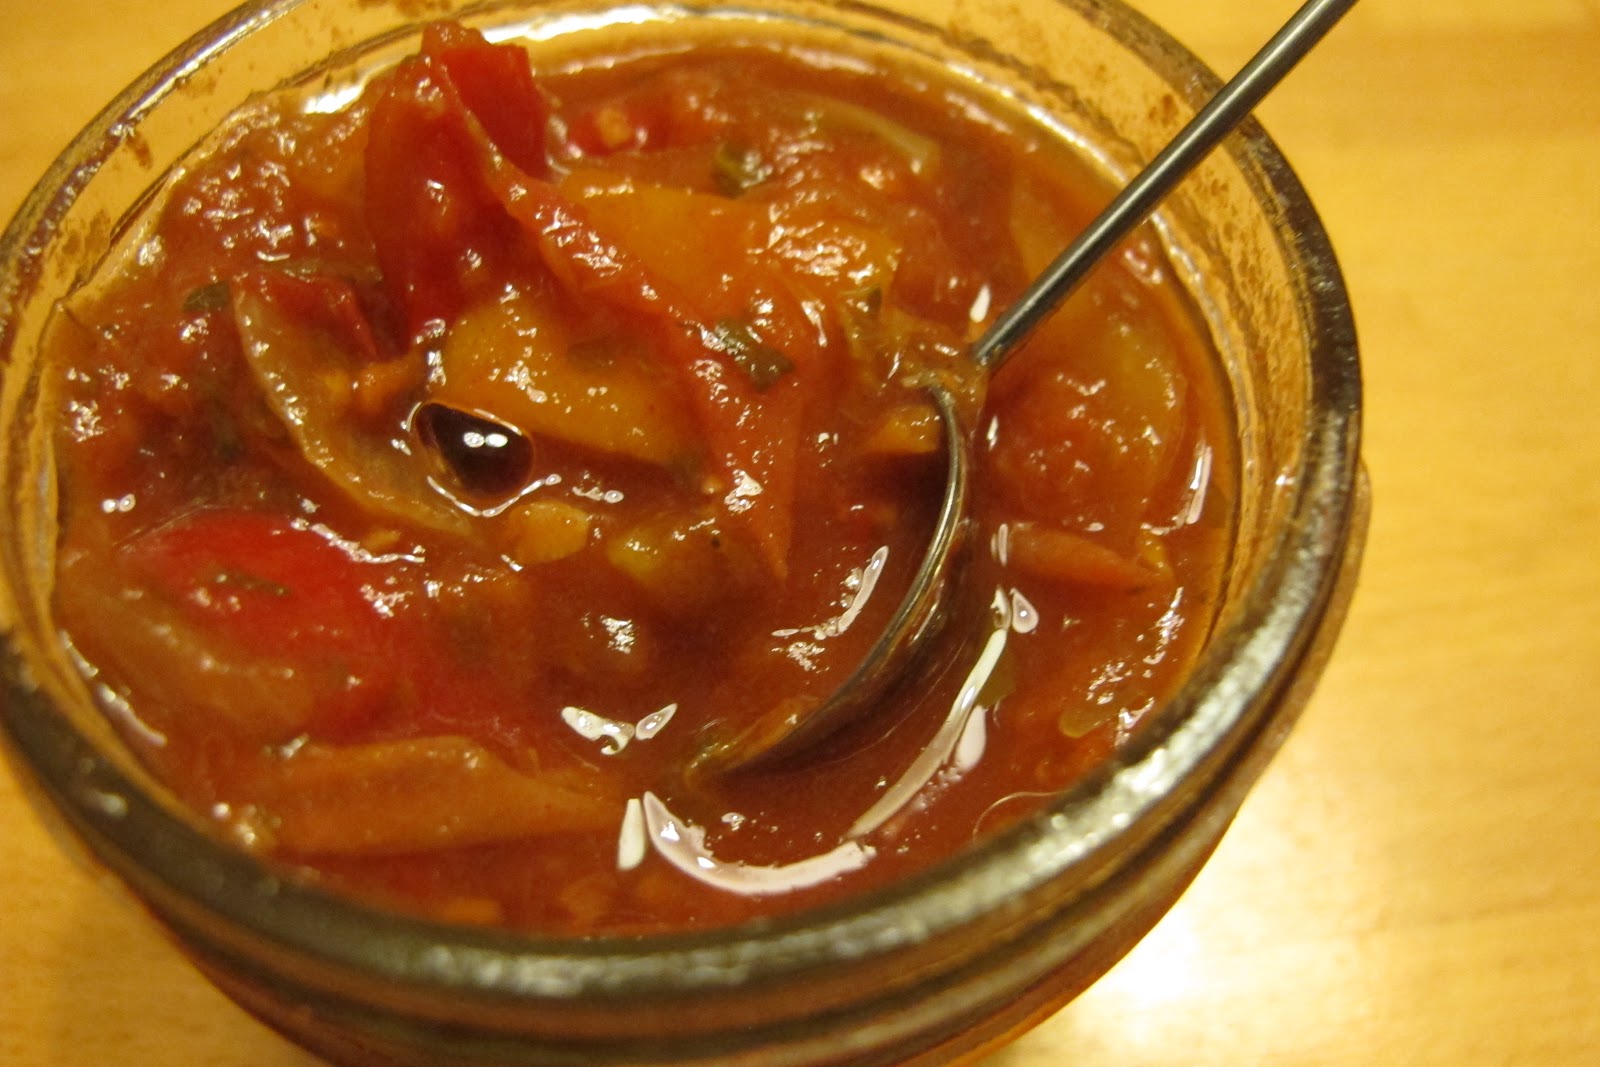
Red-Hot Salsa

Red -Hot Salsa

This fall, I had a bounty of tomatoes and peppers as the first frost approached. I made three different types of salsas with the tomatoes and peppers, and I have finally tasted the Red-Hot Salsa this weekend. After a couple of months of mellowing, this year's, Red-Hot is particularly good I think, because it was a very hot and sunny summer, resulting in fabulous tomatoes and peppers.  I used a combination of the brandywine, beefsteak and plum tomatoes, with the scotch bonnet, chili, and jalapeño hot peppers, that I grew in my garden this summer.   


Brandywine Tomato on the Vine

  • 6 cups of chopped red tomatoes
  • 4 cups of a selection of red, orange and yellow sweet peppers, chopped
  • 2 cups of chopped onions
  • 4 cloves of minced garlic
  • 2 cups of cider vinegar
  • 1/2 cup of finely chopped hot peppers with the seeds removed (be sure to wear rubber gloves and keep hands away from face)
  • 1/4 cup of sugar
  • 1 tablespoon of salt
  • 2 tablespoons of  Spanish hot smokey paprika
  • 3 tablespoon of chopped  fresh oregano
  • 1/4 cup of chopped fresh flat leafed parsley


Put all of the ingredients, except the parsley, into a large heavy enamelled or stainless steel pot.  Bring to a boil, stirring often.  Reduce  the heat and simmer for about an hour, stirring often.  When the salsa is thick enough, a tablespoon of the salsa dropped on a cold plate will flow slowly when tilted. Stir in the parsley and simmer for 5 minutes, stirring occasionally. 

Place the salsa in preserving bottles, remove air bubbles, screw lids on tightly and process  1 cup jars for 15 minutes, and 20 minutes for 2 cup jars.  This makes about 8 cups of salsa.  

If you can wait, the salsa tastes better after it has had a chance to mellow for a month or two. 

Wednesday, November 14, 2012

Macaroni and Cheese, Not

This was a favourite of my daughter's as she was growing up and she has recently asked me to share the recipe.  
My version of Mac'n Cheese
Although we always referred to it as macaroni and cheese, I would use over sized pasta shells or rigatoni, because I liked the way the larger pieces of pasta would hold the sauce, and then add things like mushrooms and onions and garlic. I once made the mistake of serving this to some of my daughter's friends when she was quiet young and was informed by a precocious eight year old, that this was NOT macaroni and cheese.  My mistake. 


Mushroom and Onion Mixture in cast iron pan
  • 1 onion finely chopped
  • 2 cloves of garlic, finely chopped
  • olive oil
  • 1 sprig of fresh thyme
  • 1 bay leaf
  • 1 cup of mushrooms, sliced
  • 2 tablespoons butter, 
  • 2 tablespoons flour
  • a pinch of paprika
  • 1 cup of milk
  • 2 cups of large shell pasta, or rigatoni
  • 1/4 cup grated parmesan cheese
  • 3/4 of a a cup of grated mozzarella cheese
  • 1/4 of a cup grated cheddar cheese
  • salt and pepper to taste
Boil water, and add salt to the water, and add pasta and boil until al dente. Drain and set aside.  While the pasta is boiling, sauté the chopped onions and garlic in the olive oil in a frying pan until soft.  Add sliced mushrooms and thyme, minus stem, and sauté until soft. Add freshly ground pepper and add mushroom mixture to cooked pasta. 

In a pot, heat milk with an onion and bay leaf, but do not let come to boil.  Set aside.  Melt butter, slowly add flour while stirring and let start to turn brown.   Add a little of the warm milk while stirring until the mixture is smooth.  Gradually add the remainder of the milk, constantly stirring. Add the parmesan and mozzarella cheese and slowly cook while stirring until the sauce thickens.  Do not let boil. Remove onion and bay leaf from sauce. Stir in paprika, taste, and add salt and pepper to taste.

Add cheese sauce to the pasta and mushroom mixture, and stir.  Spread in casserole dish,  sprinkle grated cheddar cheese over top, cover with tin foil and bake at 350 F for 30 minutes.   Remove tin foil and put back in oven for another 10 minutes or until the top is golden.   

Note:  I sometimes add chopped bacon, crisply fried, to the vegetable mixture if there are no vegetarians in the crowd.  


Wednesday, November 7, 2012

Festive Pomegranate Quinoa Salad

Every year the United Way Committee at my office hosts a potluck fundraiser lunch. The pomegranate quinoa salad I contributed this year was a big hit and I promised to share the recipe, so here it is.  

Pomegranate Quinoa Salad
  • 2 cups of quinoa
  • 4 cups of water
  • 1 preserved lemon*
  • 2 garlic cloves, finely chopped
  • 2 stalks of celery finely chopped
  • 1/2 cup of olive oil
  • 1/3 cup of sherry vinegar
  • seeds from one large pomegranate
  • 1 bunch of cilantro finely chopped
  • salt to taste
Rinse quinoa well.  Combine water and quinoa in pot and bring to boil, turn temperature down, cover and simmer for 10 minutes. Remove from stove and place in bowl.  Add olive oil, sherry vinegar and garlic to hot quinoa. Rinse the preserved lemon, remove pulp, and finely chop.  Add to quinoa mixture and stir. Set aside to cool to room temperature.  Finely chop celery, and place on top of room temperature quinoa along with pomegranate seeds and cilantro.  Gently stir just before serving. Serve at room temperature. 

*Because preserved lemons are hard to find, I make my own.  They are remarkable easy to make and an ingredient that adds an interesting freshness to a dish.  An earlier entry details the process.  

Tuesday, September 25, 2012

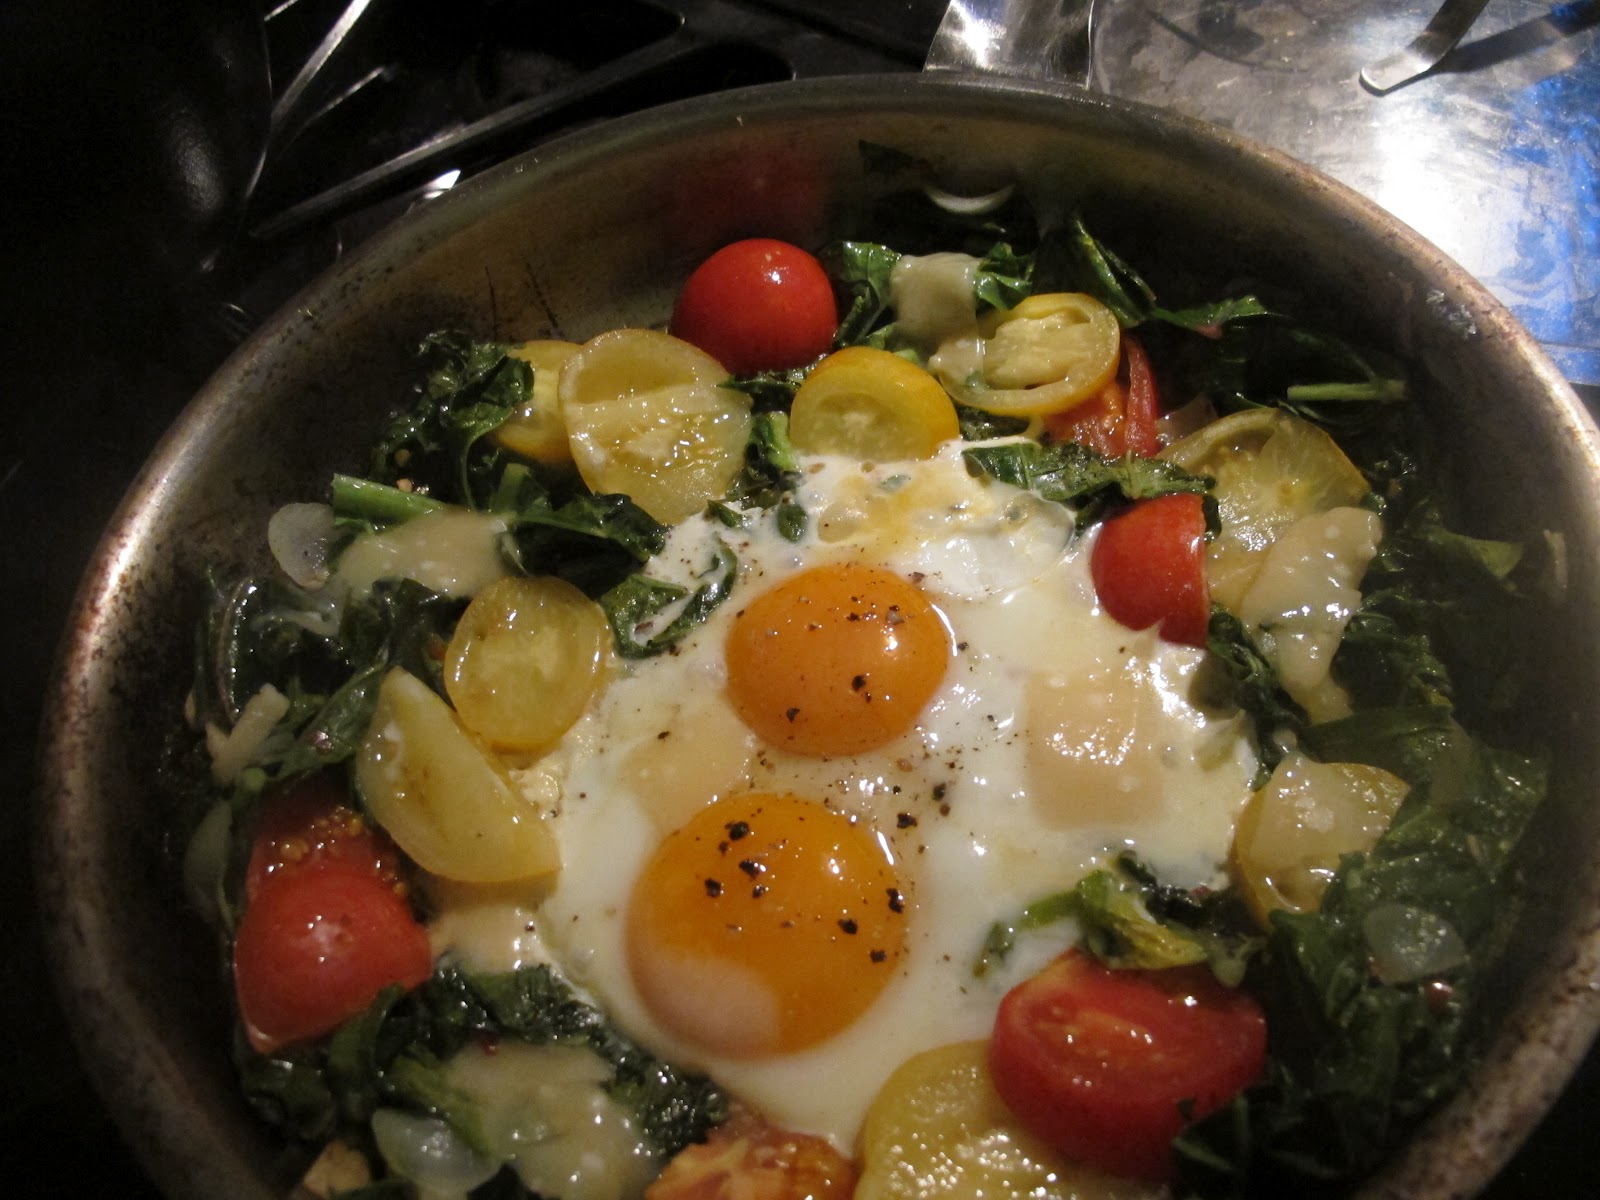
Kale and Heritage Tomatoes with Eggs

I make a this single pan meal at least  once a week, often when I get home after a tough day at work and don't feel like cooking, and sometimes for brunch on the weekend.  At this time of year, it is very easy, all of the vegetables come straight from the garden, eggs from my neighbour (that is why they are so yellow), and olive oil from the pantry.  It is fast and easy, tastes great, and I think is relatively healthy.  


Autumn Garden Vegetables and Eggs
  • 1 clove of garlic
  • 1 small onion
  • 1 bunch of kale, sometimes I use Swiss chard or beet leaves
  • a selection of heritage tomato or not, depending on what you have available
  • 1/2 a small hot pepper
  • some fresh thyme
  • salt and pepper
  • 1 or 2 eggs per person
  • olive oil
  • salt and pepper
Chop the garlic and onion, and hot pepper and sauté in a heavy frying pan.  
Clean kale and trim off heavy stems.  Loosely chop and add to pan with a tablespoon or so of water and the juice of one lemon, or some wine vinegar.   Add thyme leaves.  Lightly stir and cook until the kale starts to turn a bright green and is tender. Add salt and pepper to taste.  Form a well in centre of the pan, pushing the kale to the sides.  Break eggs into the well in the centre of the pan and place tomatoes around the edges on top of the kale.  Cover with a lid and cook for a few minutes until the eggs are cooked to the consistency you like. I like my yolks to be runny.  Grind fresh pepper on top of eggs and serve.

Wednesday, September 12, 2012

Lemon Pepper Pickled Green Beans

This spring, Denis brought me Haricot Vert seeds to plant in my country garden.  Denis, who has strong French Canadian roots, swears that they are the only type of green bean worth planting. For the past few weeks I have been harvesting a bounty of his beautiful green beans, long straight and skinny.  

I had two favourite recipes for pickled green beans until last winter, when Cathy visited and brought her Dilled green beans which she claims she made from a recipe in a book I gave her twenty years ago. What a memory!!  Now, I have three favourites; in addition to Cathy's Dill version, I also make a lemon and hot pepper version inspired by a recipe in Small Batch Preserves and a horseradish version that has evolved from a recipe I cut from a magazine years ago.


Denis' Pickled Lemon Chili Pepper Green Beans,  and Not Denis' Yellow Beans 


Lemon Pepper Green Bean Pickles

2 pounds of french green beans
2 1/4 cups of cider vinegar
1 1/4 cups of water
1 tbsp of pickling salts
1 tbsp of sugar
1 tbsp of pickling spice
3 small red hot peppers.  I like to use the Tai peppers
1 organic lemon
3 one pint preserving jars

Wash and trim beans to fit length of jars.  Mine are 4 inches long.
Peel  6 or 7 thin long strips of rind from the lemon, taking care to include none of the white pith and set aside.

Combine vinegar, water, juice from lemon, salt and sugar in medium stainless steel pan and bring to a boil.  Add beans and bring to boil for 1minute. Remove from heat and drain, reserving liquid.  Bring liquid to boil again.

In sterilized jars, place 1tsp (5ml) of pickling spice, one pepper and a couple of the strips of lemon rind rind into each jar.  Pack beans into jars, standing length wise and pour liquid into jars to 1/4 inch from top of jar. Process for 10 minutes.

Note: the quicker you get the beans into the jars and process,  the greener the beans remain.


Wednesday, September 5, 2012

Heritage Tomato and Quinoa Tabbouleh Salad

This past weekend I visited my brother and his family at their weekend place and brought a selection from my garden including heritage tomatoes, parsley, mint, onions and garlic.  We decided to make tabbouleh and because of gluten sensitivities in the group, used quinoa instead of wheat berries.  My nephew Matthew, provided the commentary while I chopped vegetables, and Debbie made the quinoa. 

Red, Yellow and Green Heritage Tomatoes with Quinoa in Tabbouleh Salad
1 cup of quinoa
4 or 5 tomatoes, about 2 cups when chopped
1 onion
2 cloves of garlic
1 large bunch of parsley
1 branch of mint
juice of 1 lemon
3 tablespoons of olive oil
sea salt to taste

Rinse quinoa and prepare.  Set aside to cool.  Dice tomatoes and place in  serving bowl.  Finely chop onions and garlic and add to tomatoes.  Chop parsley and mint and add to bowl of chopped vegetables.  Mix and add lemon juice, olive oil.  Add cooled quinoa, and toss.  Salt to taste.  


Tuesday, August 14, 2012

Pesto Zucchini Noodles

Zucchini Noodles with Pesto and Parmesan
My friend Ian introduced me to zucchini noodles a few months back, and I have to admit, I was sceptical and then I tasted.  He has this gadget, Taglialegumi, Plastica  (model # A4982799) made by the Italian Paderno , that turns zucchini into noodles that looks just like spaghetti.   Ian served the zucchini noodles with a cold tomato and date sauce which was so good that I immediately started looking for a gadget of my own.  I found one at a local restaurant and have been experimenting with different versions of zucchini noodles since then.
Zucchini coming out of Gadget 

I currently have an abundance of zucchini and basil in the garden, and have just harvested my garlic,  and so made a pesto version of the zucchini noodles this past weekend to rave reviews.

Zucchini Noodles
  • 1 large green zucchini, 
  • 1 large yellow zucchini
  • 1 teaspoons of salt
Pesto
  • 1 bunch of basil, about 2 cups of leaves
  • 2 cloves of garlic
  • approximately 2/3 of a cup of olive oil, 
  • 1/2 cup of Parmesan Reggiano, freshly  grated 
  • 1/4 cup of pine nuts or sunflower seeds
Cut zucchini noodles with noodle maker. Alternately  use a mandolin and slice both ways.
Salt zucchini  and toss gently.  Let rest in a colander for 10 or 15 minutes.

Mean while, prepare pesto.  Remove basil leaves from stems, discard stems and place leaves in food processor.  Add garlic,  olive oil and and process.  Add grated Parmesan cheese and sunflower seeds and process.  Add more olive oil if needed.  

Gently squeeze out excess water from zucchini noodles. Place in bowl.   Stir in pesto and serve.   

Note: my sister found a Taglialegui on Craig's List.

Friday, August 10, 2012

Andrea's Quinoa Salad


While Jean Pierre was busy making his zucchini spread,  Andrea was making this colourful Quinoa Salad.  She used a combination of golden and red quinoa and a multitude of summer herbs and vegetables  from the garden.  The end result was spectacular, to the point that my vegan daughter hid a secret stash at the back of the refrigerator to bring home.  
Andrea's Quinoa Salad
  • 1/2 cup of golden quinoa
  • 1/2 cup of red quinoa
  • 1/2 red bell pepper 
  • 1 medium sized yellow zucchini
  • 1 medium sized green zucchini 
  • 1/2 cup of raisins
  • a handful of flat leaf parsley
  • a handful of cilantro leaves 
  • some fresh thyme
  • 1 preserved lemon
  • 3 scallions
  • large handful of chives
  • olive oil
  • red wine vinegar
  • salt and pepper to taste
Rinse quinoa well to ensure not bitter.  Boil two cups of water. Add washed quinoa, reduce to a simmer and cover and cook for about 10 minutes.  Remove from heat, and let rest for 4 minutes.  Remove lid and fluff with fork, then cool.

Chop red pepper, zucchini, scallions and chives, and place in large bowl.  Rinse preserved lemon and finely dice.  Add to bowl.  Add cooled quinoa, and mix.  Finely chop parsley,thyme, and cilantro. Add to bowl.  

Prepare dressing with vinegar, olive oil, salt and pepper to taste.  Add to bowl and gently toss.  Taste and adjust salt. 

Chill and serve. This tastes best the next day, when all of the flavours have had a chance to meld. 


Aunt Garrie's Tomato Soup Cake

Growing up, my Aunt Garrie made Tomato Soup Cake for family events.  It was something we always looked forward to, partly because of the novelty of a cake made with tomato soup, but also because it tasted very good; and so when she asked what she could bring to the barbecue, I suggested the Tomato Soup Cake.  This recipe was passed down from my great grandmother, to my grandmother, to my aunt, and now she is passing it on to the next generation.

Aunt Garrie with her Tomato Soup Cake with ice cream

  • 2 cups flour
  • 1 teaspoon baking soda
  • 2 teaspoons baking powder
  • 1 teaspoon cinnamon
  • 1/2 teaspoon cloves
  • 1 teaspoon nutmeg
  • 1/2 cup shortening
  • 1 cup white sugar
  • 1 10 oz. can tomato soup
  • 1 cup chopped walnuts
  • 1 cup raisins or currants
Sift dry ingredients together.  Whisk  shortening and sugar until fluffy.  Dust raisins and nuts with flour.  Alternately add dry ingredients and soup beating well each time. Stir in nuts and raisins. Mixture will be thick.  Bake at 350 degrees for 50-60 minutes in a greased loaf pan, or 45 minutes in a ring pan.

Thursday, August 9, 2012

Jean Pierre's Fire Roasted Zucchini Spread

Jean Pierre's Fire Roasted Zucchini Spread 
My friends, Andrea and Jean Pierre were in the country this weekend helping me prepare for my big barbecue.  While reviewing the menu, Andrea declared that I didn't have enough appetizers, and so after some discussion, Jean Pierre  suggested he take advantage of the abundance of zucchini, onions, peppers and garlic in the garden.  The end result was this fabulous spread with a bit of a kick. 
  • 4 or 5 large zucchinis
  • 2 onions
  • 1 head of garlic
  • juice of 1 lemon
  • olive oil
  • 1 small habanero pepper, seeds removed
  • 1 14 oz can of chickpeas
  • salt and pepper to taste
Grill whole onions over open fire,  charring the exterior, over medium heat until insides are soft and sweet.  Chop zucchini into large chunks, salt, and set on paper towels to drain.  Grill over fire.  Remove seeds from pepper and grill. Roast a whole head of garlic at the same time until soft.

Chop the top off of the garlic head and squeeze out soft garlic into a food processor.  Add grilled zucchini, onion and pepper, chickpeas and lemon juice to food processor. Blend, slowly adding olive oil until a smooth consistency.  Add salt and pepper to taste.   


Andrea with Jean Pierre preparing the Zucchini
Note:  Jean Pierre held back on the amount of hot pepper he put in the spread because of the diverse ages and backgrounds of the guest list.   

Wednesday, August 8, 2012

Nonna's Frittelle Fiori de Zucchine

Zucchini Flower Fritters


Nona with her Frittelle Fiori de Zucchine
Yesterday, my friend Christine and her in-laws visited me in the country.  Christine's in-laws are from Calabria, the toe of Italy. Her Nonna is most comfortable in front of the stove lovingly making the family favourites for a large extended family. I have fond memories of the fabulous meals she would produce when I helped with the annual ritual of putting down hundreds of bottles of tomatoes every fall.


Cleaned Zucchini Flowers
I walked with Nonna through my garden, hoping for advice, and she immediately focused in on the zucchini flowers.  Nonna told me that every morning her husband goes out to their garden and picks zucchini flowers only when they are perfect,  and stores them in the refrigerator until there are enough flowers to make Frittelle Fiori de Zucchini.  Later in the afternoon her husband walked through the garden and picked a zucchini flower, bringing it back to his wife and presenting it as a special gift.  

Zucchini flowers  are a special treat in the summer and the only reason I grow zucchini in my garden. I have cooked them a number of ways, however had never heard of, or tried this recipe, and so I was very pleased when Nonna offered to show me how to make it. I love the simplicity of this recipe, and the decadence of the flowers and the indulgence of deep frying.


Chopped Zucchini Flowers
  • approximately 2 cups of large zucchini flowers
  • 3/4 cup of all purpose flour
  • 1 1/2 cups of water
  • 1/2 cup of grated pecorino cheese
  • salt to taste
  • 1 cup of light vegetable oil, I prefer grape seed oil
Carefully clean inside and out of flowers, removing pollen, bugs and anything else that may have gotten into the flower.  I was being very gentle with the flower, until Nona got frustrated with me and took the flower away, turned it inside out and ran it under water to make sure that all the dirt was removed.  Remove the stem and leaves, and the pedestal.  Cut flowers into quarters the length of the petal, and then chop into 1/2 slices.  Nona told me her sister did not chop the petals and only quartered the flowers.  Put in a large bowl and dredge with the flower.  Stir in the water until a bit gooey.  Add cheese and salt to taste 

Dredging With Flour

Put oil in large cast iron pan and heat until it bubbles when a bit of batter is dropped into it.  Spoon a large spoon of batter into the hot oil.  
FrittelleCooking in Hot Oil
Flatten out with back of spoon and cook until golden brown, and then flip. Cook until golden brown, drain on paper towels and serve warm.

Thursday, July 12, 2012

Chilled Summer Pea Soup with Mint

I currently have a bounty of peas.  In addition to the peas from my garden,  there were two bags of fresh peas, one of sugar and the other snap peas in my box of vegetables from the farm.  Fresh peas from the pod are so fabulous and I wanted to capture that essence in a cold soup for dinner on a hot summer day. 


Peas from the pod remain sweet for only a very short time and then start to become starchy, so I needed to use as quickly as possible.  With both fresh mint and shallots from the garden, in combination with the peas, the freshness of this soup was hard to beat.  


2 shallots, finely diced
2 tablespoons of butter ( or olive oil, if vegan)
5 cups of shelled peas
2 cups of vegetable broth
4 or 5 leaves of fresh mint
1 cup of cream (or soy milk, for my vegan daughter)
kosher salt to taste
freshly ground pepper to taste


Sauté shallots in butter, until soft, but not coloured. Add vegetable broth and simmer for a few minutes.  Cool.  Briefly cook peas in boiling water, until softish, retaining some bite.  Rinse in ice bath to stop cooking.  


Combine cold broth, peas and mint in food processor and pulse until a smooth constancy.  Strain, add cream.  Season with salt and pepper.  Serve, or store in refrigerator until ready to serve.  


Note, the peas become starchy very quickly, so do not store for too long.  

Wednesday, June 27, 2012

Tomato and Garlic Scape Tart

I made this tart for my friend Ann's potluck birthday party, and so, after a perfect weather weekend in the country, I came back to the city, tart in hand, to Ann's empty house with partially deflated balloons on the front porch.  I had missed the party by a day.  I have promised to make this again the next time Ann visits, hopefully with fresh tomatoes from my garden instead of from the store. 

I used garlic scape pesto, however you could substitute finely chopped garlic or shallots in its place. Traditional pesto made with basil would also be good, however I would substitute a milder cheese for the cheddar when using the basil version.


Pastry

Use your favourite sturdy pastry recipe. 


Filling


  • a selection of tomatoes
  • sharp cheddar cheese
  • olive oil
  • garlic scape pesto
  • salt and pepper to taste
Slice large tomatoes into thick slices and salt, let rest on paper towels to drain off excess fluid. If cherry tomatoes are large, cut in half and treat the same way.  

Roll pastry into large circle about 12" in diameter.   Place on parchment paper, on baking sheet with out edges.    Cover centre 8" diameter of pastry with 1/8" slices of cheese.  Arrange tomatoes over cheese.  Mix olive oil and scape pesto.  Paint tomatoes with mixture.  Fold up edges of pastry to contain tomatoes.  Salt and pepper top.  Bake at 375F for about 40 minutes until tomatoes look done.  

Monday, June 25, 2012

A Variation on my Award Winning Cherry Pie


This year's bumper crop of cherries
There was a cherry tree in my back yard when I first moved in, and over the years it has matured into a large and beautiful tree that shades the yard and produces a bounty of cherries in June.  Time to make cherry pie. 

As a young girl, my mother decided I should be a home economist and in order to prepare me, entered me in baking competitions.  While other kids would practice the piano or go to dance lessons, or hang out and play, I would come home after school and practice baking.  I would bake the same recipe with a slight variation,  cut out a wedge, examine the consistency,  taste and then wrap up and put the experiment in the freezer and start all over again.  Cherry Pie was one of my Red Ribbon winners, and so, after not having made the recipe for years, I took down my old recipe book from the top shelf and baked it once more.


The recipe from my youth used frozen cherries, so working with fresh cherries required some adjustment, and then it was sweeter than I would bake it now, so I modified the recipe once again, and then I substituted Amaretto for the almond extract.  I am not sure it would win the red ribbon, however it does feel right now.


My less than perfect cherry pie.  I am definitely out of practice. 


Preheat oven to 375F

Pastry

  • 2  1/2 cups of sifted pastry flour
  • 1/2 cup of ground almonds
  • 1 tablespoon of sugar
  • 1/2teaspoon of salt
  • 3/4 cup of cold butter
  • 5 to 6 tablespoons of cream
  • 1/4 teaspoon of almond extract
Mix dry ingredients, and cut in butter.  Mix cream and almond extract. Gradually stir in cream mixture until mixture holds together.  Do not overwork.  Split in half and form into two flat balls.  Wrap in plastic and refrigerate while preparing filling. 


Cherry Filling

  • 5 cups of pitted Bing cherries
  • 1/4 cup of Amaretto
  • juice of one lemon
  • 1 tablespoon of sugar
  • 1 tablespoon of cornstarch
Add Amaretto and lemon juice to cherries and let rest for half an hour.  Mix sugar and corn starch together.  Add a bit of water to make paste.  Drain liquid from cherries, and mix juice with corn starch mixture.  Heat over hot stove until clear.  Add cherries and set aside.


Roll half of the pastry and place in 8" pie plate.  Add cherry mixture.  Roll other half of pastry and cut into strips.  Weave lattice on top of pie.  Cover edges of pastry with foil, and bake for 40 minutes. 

Sunday, June 17, 2012

Garlic Scape Pesto

Garlic scape in the garden today 
This past fall I planted 10 different types of garlic in my garden, not knowing which I preferred.  Unfortunately, the pen I used on the name tags washed off over the winter, so I still won't know which is my favourite and will have to be disciplined enough to save some of my favourite for planting later in the fall.  Lesson learned - keep notes, tags aren't good enough. 

On a positive note, I now have an abundance of garlic scapes.  In the past I would throw a few in a stir fry, or in a salad or sauté some as a side.  However over a hundred scapes at one time presented a challenge, until my I remembered my friend Denis raving about the pleasures of Garlic Scape Pesto, and I have to say after making this once, it will become an annual event.


Of course, I didn't have pine nuts in the cupboard or sunflower seeds for that matter, but I did have pumpkin seeds, so I gave it a try, and will definitely use again.
Garlic Scape Pesto

Garlic Scape Pesto

  • 2 cups of garlic scapes 
  • approximately 1/4 cup of olive oil
  • 1/4 cup of grated parmesan cheese
  • 1/4 cup of pumpkin seeds, pine nuts, or sunflower seeds
  • 4 sealable small bottles for storing
Cut scapes into small pieces that the food processor can handle.  If any of the scapes have progressed to the hard flower stage, remove hard piece and discard.  Chop in food processor, adding olive oil slowly until the mixture is slightly more fluid than a paste.  Add about the same amount of grated parmesan cheese and pumpkin seeds as olive oil.  Process and add more olive oil until correct consistency.

Place in sterilized bottles, seal with olive oil, and store in refrigerator.  

I also made a vegan version with no parmesan cheese and twice the amount of pumpkin seeds and added some salt to compensate for the missing salt from the cheese.  


Tuesday, June 12, 2012

Wilted Greens on Vegetable Ragout on Quinoa

Monday was both a rough day at the office and a hot and steamy summer day, and I had planned on making my fallback quick and easy summer dinner, salad Niçoise, when my daughter arrived home and announced she had decided to become Vegan.  Salad Niçoise without eggs, cheese, anchovies and tuna is not possible!   And if adjusting for a vegan diet were not enough to deal with at the end of a tough day, the salad greens I had picked  from my garden  in the country on Sunday, had wilted, sitting in the car, in the sun, while I stopped at a friend's going away party on the way home. 

Time for a new strategy.   I checked the refrigerator, and decided on a vegetable ragout on quinoa.  As I was about to throw out the greens, my daughter suggested wilted greens - so  together - Claire and I made Wilted Greens on Vegetable Ragout on Quinoa, a vegan meal without having to resort to the dreaded tofu. 


Vegetable Ragout

  • 1 large red onion coarsely chopped, approximatey 1 cup
  • 2 large cloves of garlic, finely  chopped
  • oyster mushrooms, about the size of your fist
  • a handful of shitake mushrooms, stems removed
  • 1 red pepper, chopped
  • 1 small eggplant, sliced
  • 1 28 oz can of whole stewed tomatoes, coarsely cut
  • the end of a bottle of of wine, red or white 
  • olive oil, quantity depends on your cooking style. I tend to use less
  • salt  and peper
  • a pinch of dried chile flakes
  • a sprig of thyme
  • a handful of fresh basil
Heat olive oil in a stainless steel pan.  Add onions and garlic and soften, set aside.  Sauté eggplant, mushrooms and red pepper.  Put all cooked vegetables in a large stainless steel pot and add tomatoes, chile flakes, thyme, and wine if you have some. if not, add a dash of balsamic vinegar and bring to boil, reduce heat and simmer for 15 minutes,   Add herbs, and salt and pepper to taste, simmer for a few more minutes. 


Wilted Salad Greens

  • 4 cups of washed mixed salad greens
  • 2 cloves of garlic,
  • 1 shallot, finely chopped
  • fresh herbs such as coriander, chives, 
  • extra virgin olive oil, 
  • 1 tablespoon of balsamic vinegar
  • salt and pepper to taste.
Heat stainless steel frying pan, add olive oil and sauté garlic and shallots,  add vinegar, greens and herbs, lightly cook until warm and wilted.  Do not overcook. Salt and pepper to taste. 

To serve, place cooked quinoa in bottom of bowl.  Ladle ragout over quinoa and place wilted vegetables on top.  Sprinkle with coarse smoked salt.